Sewing Indie Month: easy Sashiko blouse tutorial
It's my turn to post a tutorial by another participating designer from Sewing Indie Month - and I'm pleased to present Yuki, the designer of Waffle Patterns. In her interview with me Tilly asked if I had any tips for people who are just starting out with embroidery and I mentioned Sashiko... Sooooo - great minds must think alike (teehee!) because Yuki came up with a brilliant easy non-embroidery embroidery tutorial based on traditional Japanese Sashiko embroidery. Take it away, Yuki!

The Róza is a cute tunic blouse anyone can wear nicely, and the front yoke is a great space for embroidery. We can play and put our personalities here. I’m not an embroiderer, so I came up with a very easy way to add embroidery to a Róza! I wanted to try some embroidery from my the country I originally come from, like Kati. So, I chose Sashiko from Japan. My Sashiko sample from Japan:

It is originally embroidery by hand and very functional, like a quilt. The 3 patterns below are all traditional and arranged for easy sewing machine stitching. The patterns are included as printable sheets in a pdf file you can download. I chose the left-hand pattern for my embroidery. It is called “Sippoh,” which means treasuries in Japanese.

Cut Fabric larger than yoke // Fuse interfacing:

Cut the fabric larger than the yoke pattern piece, we will cut it to the correct size after it is embroidered. Fuse interfacing to the wrong side of the fabric.
Transfer the pattern:

There are many ways to transfer Sashiko patterns. Choose a suitable way depending on your fabric. Since the pattern is simple and geometric, I used a tracing wheel and carbon paper like I do for normal sewing, supported by a circle ruler.
Just trace with sewing machine stitches:
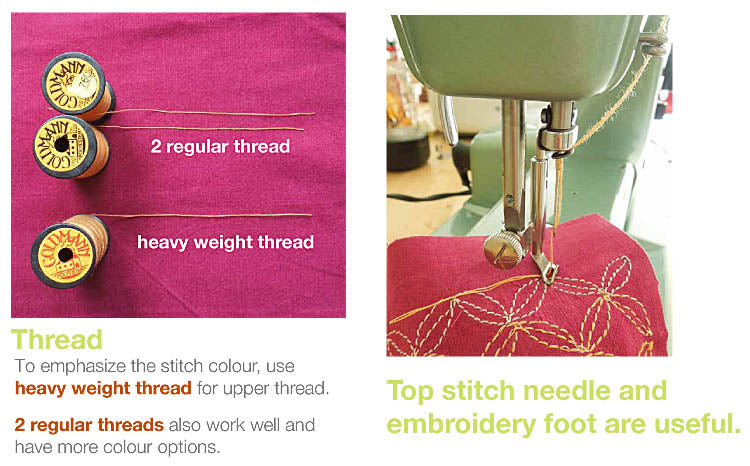
Just trace the transferred lines with your choice of threads!
Embroidered yoke:

Press, then cut your embroidered fabric to the dimensions of the front yoke pattern piece, and sew your blouse.
Finish:

I used 2 threads for the upper thread to stitch and made 6 colour gradations with 3 color mixes of 2 threads each, using three thread colours. Thank you Yuki! I love the colors and subtle gradations on this blouse. Here is the printable PDF file with the three Sashiko patterns, and a PDF of the tutorial itself for offline reference.
***
Yuki posted a tutorial for French Boutis by Sylvie of Soma Patterns - a beautiful, sculptural traditional surface design similar to Trapunto. A couple weeks ago, I wrote a rectangles-only, no-waste peasant blouse tutorial for Soma Patterns' blog (PDF here).