Hungarian Embroidery Sampler Part One: Preparations
Friends, it is that time of year here in the Northern Hemisphere: everything slows down and everyone tries to get in a few more weeks of sunshine and vacation before school or work starts up again in earnest. Or in my case, before I'm buried in getting everything ready for the launch of my online store this fall. So, I've prepared a little surprise for you, something portable and handwork-ful (I know that's not a word. But it should be!): the Hungarian embroidery sampler blouse that we can sew up and embroider together. (No embroidery experience necessary.) Because what else can one do when one has some lovely fabric, and lots of pretty thread:

Why, one makes an embroidered blouse, no? So let's get started! Here's what you'll need:
- The embroidery pattern: download the PDF;
- A sewing pattern; a great free pattern is the Sorbetto top from Colette Patterns (the version with the plain front). The Róza top would also work great for this project. If you don't feel like sewing a whole new blouse (although this one is very quick to stitch up), you can use an existing one, as long as it has a plain, unembellished, flat front. The design would also work great on a table runner or throw pillow.
- Fabric for the blouse. I used raw silk here but cotton broadcloth with a lighter hand, cotton lawn, or light to medium-light weight linens would be equally good choices for a blouse or tank top. For home decor projects, heavier-weight linens would work well.
- Carbon paper to transfer the design onto your fabric, or a light box or bright window, and a lead pencil. Carbon paper for handwriting works well (on carbon paper for handwriting) or the carbon paper available at Sublime Stitching. It stays on the fabric while stitching and usually (I have not tested every fabric!) washes out with soap.
- Embroidery thread in a color that works well with your blouse fabric. I'm using perle cotton in size #8.
- Embroidery hoop (optional);
- Needle - for #8 perle cotton I generally use a size 20 or 22 Chenille needle.
Once you've got all your supplies assembled, make your plain-front Sorbetto. I made mine in a pink raw silk noil. Pink because... Well I just like pink.

Now, assemble the Hungarian Sampler embroidery pattern's two first pages that contain the pattern, the same way you would assemble any PDF pattern larger than a US Letter or A4 page, whether for sewing or embroidery. To transfer the pattern onto your blouse fabric using carbon paper, first position the pattern where you want it on the front of the blouse, then pin it to the blouse at the corners of the pattern (NOTE: these photographs show an earlier version of the Hungarian sampler printout but the revised new version works the same way.):

Next, take a hard flat board like a cutting board and slip it inside the blouse, right under the pattern:

Then take the carbon paper and slip it between the pattern and the blouse, with the carbony (transferrable) side down towards the blouse fabric (you will save yourself some grief if you check which side of the carbon paper is facing downwards now... trust me!):


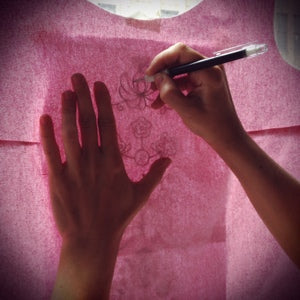
Now trace that pattern!

And voila! your blouse is ready to be embroidered:

If you dislike working with carbon paper or just can't get your hands on any right this minute, there's another way to transfer the pattern to your blouse's front, using a light box or even just a window. The downside to using a window: it has to be daylight outside... In this case, don't sew up your blouse, just finish the edges of the front piece so they won't unravel while you stitch. I serged the straight edges and staystitched around the neckline and armholes, like this:

So, first tape the embroidery pattern to the window:

Now position your blouse front over the pattern, and tape it to the window:

Then grab a soft lead pencil (I use this one) and trace the pattern onto the cloth.
Now go get your blouse ready! And I will see you back here for Part 2 of the Hungarian Sampler tutorial series.
Links to all tutorial pages in the series:
- Hungarian Embroidery Sampler part one: preparations - about threads, needles, hoops, and how to transfer embroidery patterns
- Hungarian Sampler part two: floral motif from Southwestern Hungary - chain stitch, starting and finishing your thread
- Hungarian Sampler part three: Transsylvanian tulips - buttonhole circles, stem stitch
- Hungarian Sampler: administrative update & some additional resources
- Hungarian Sampler part four: witchy stitching from Buzsák - open chain stitch
- Hungarian Sampler part five: filling in the witchy stitching from Buzsák - herringbone filling stitch
- Hungarian Sampler part six: stamina – completing our Buzsák witchy stitching - back stitch, straight satin stitch
- Hungarian Sampler part seven: variations
- Hungarian Sampler part eight: “woolly” stitching from Hungary’s central plains - 'fake' satin stitch
- Hungarian Sampler part nine (the last): Matyó rose from Northern Hungary - oblique or slanted satin stitch
- Blouses to embroider: any blouse with a flat front would work. The Róza top pattern would also work great for this project.
- Download the Hungarian Sampler PDF embroidery pattern (2 pages, formatted to print on either US Letter or A4 size paper).
- Share your work on Instagram and make sure you tag your pics with #kateandrosepatterns #hungariansampler!