Hungarian Sampler Part Five: Filling in our Buzsak witchy stitching
When you take a look at the stitching we'd done so far in the sampler, you will notice we haven't yet filled in any areas. When you look at this photograph I took in Buzsak at the embroidery exhibit, you can see the v-shaped stitches used inside the areas outlined by open chain stitches:
So, in today's installment of the series we'll learn a new stitch, one called the fishbone stitch (you'll see why), used in Buzsak to fill in leafs and petals outlined with the open chain stitch from Part Four of this series. (We'll need one more filling stitch to complete this motif, for the dots on top of the tulip. But let's not get ahead of ourselves!) Begin by looping your thread into the back of your existing stitches to secure it, then travel (or lead) the thread to the tip of one of the outlined areas on the back of your embroidery. A note on this that I feel I should have made before: lots of people just use knots instead of the long tails I've been using to start and finish each thread. I prefer the long tail, mostly because I have more of a tendency to pucker the fabric when I use knots. I also really like it when the back of my stitching is also fairly smooth. But... the embroidery police will not come and get you if you DO use knots. It is yours to work on as you please. This is how the back of mine looks right now:
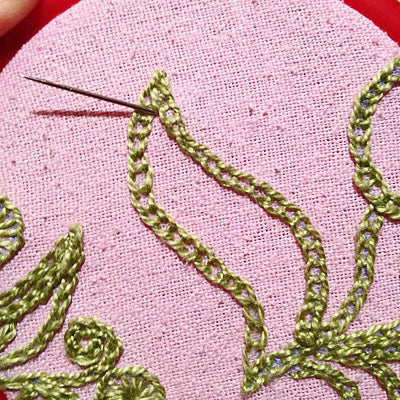
At the tip of this leaf, I take my needle to the front of the fabric:
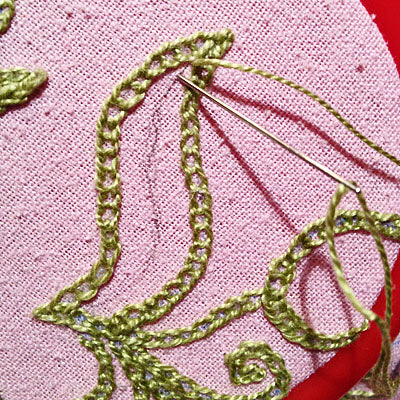
At this point, you may want to take a lead pencil and draw a line winding down the middle of this leaf (you will see why in a second):
Then take your needle down to the back of the embroidery about 1/8" or 2 mm ahead on this middle line:
And bring it back up slightly to one side of where you first brought up the thread (either side - it really doesn't matter), just next to it right next to your outlining chain stitches:
Then stitch down right across your first stitch, on the other side of the dividing line, right past the BOTTOM of the first stitch, overlapping your first stitch at the tip (but just at the tip), and bring your needle back up on the OTHER side of the first stitch, right next to the outline:
Now stitch down by crossing to the other side of the previous stitch, overlapping your previous stitch at the tip (but, again, just at the tip), and bring your needle back up to the right side of your embroidery next to the top of that stitch, right at the chain stitch outline:
Let me show you how this stitch begins on a slightly different shape, this time working the stitch from the "bottom" up. Start by bringing the needle up at one end of the outlined shape:
Then make one stitch, taking your needle down 1/8" or 2 mm down the center dividing line (most of the time I just imagine this line but I drew it in again so you can see it too), bringing your needle up again right next to where you first brought it up:
Then stitch down to the wrong or back side of your embroidery by crossing your first stitch, overlapping your first stitch at the tip, and bring your needle back up on the other side of the first stitch, next to the chain stitch outline:
Now take your needle back down by crossing the stitch you just completed in the previous step, overlapping the tip, and bring it back up at the outline on the side you just crossed over to:
And then do the same thing on the other side:
And again:
See how nicely this shape is filling out? It goes fast:
Also, see why it's called a fishbone stitch? The way the tips of the stitches cross to meet at one end does kind of look like the bones of a fish... When you get to the end, your stitches will become very tiny:
When you can't possibly fit in another stitch, you're done with that outlined shape. Fill in all the leaves and petals this way, so that all you have left are the stamina of the tulip - the three lines and circles above the tulip, that is! You'll see, it goes faster than you think. To watch a video tutorial of the fishbone stitch, go to Mary Corbet's Needle 'n Thread - hers is a much more angled version but it would work just as well to fill in the outlines. Next time we will finish the tulips of this motif, look at some possible variations for what we've done so far, and get started on the next one.
Links to all tutorial pages in the series:
- Hungarian Embroidery Sampler part one: preparations - about threads, needles, hoops, and how to transfer embroidery patterns
- Hungarian Sampler part two: floral motif from Southwestern Hungary - chain stitch, starting and finishing your thread
- Hungarian Sampler part three: Transsylvanian tulips - buttonhole circles, stem stitch
- Hungarian Sampler: administrative update & some additional resources
- Hungarian Sampler part four: witchy stitching from Buzsák - open chain stitch
- Hungarian Sampler part five: filling in the witchy stitching from Buzsák - herringbone filling stitch
- Hungarian Sampler part six: stamina – completing our Buzsák witchy stitching - back stitch, straight satin stitch
- Hungarian Sampler part seven: variations
- Hungarian Sampler part eight: “woolly” stitching from Hungary’s central plains - 'fake' satin stitch
- Hungarian Sampler part nine (the last): Matyó rose from Northern Hungary - oblique or slanted satin stitch
- Blouses to embroider: any blouse with a flat front would work. The Róza top pattern would also work great for this project.
- Download the Hungarian Sampler PDF embroidery pattern (2 pages, formatted to print on either US Letter or A4 size paper).
- Share your work on Instagram and make sure you tag your pics with #kateandrosepatterns #hungariansampler!


