How to transfer embroidery patterns to dark fabrics: a tutorial
You know all those pretty embroidered Hungarian blouses I'm obsessed with? Like this one (which is, in keeping with this week's Matyó theme, stitched in Matyó-Northern-Hungarian style):

How'd they get that complicated design onto the fabric? Okay, so I can't say exactly how this particular stitching lady did it but I can tell you about one method for how to transfer complex embroidery patterns to dark fabric (or any color fabric, really, using the right kind of paints). It's a method that's been used for a very long time and is still used in a lot of villages. Well... I'll be showing you a way that also works but does not involve paraffin oil or gasoline... Intrigued? Here goes! You will need:

- the fabric fabric/garment you plan to embroider
- printout or drawing of the design you want to transfer, I'm using a small design from the Faraway Garden pattern set, available as downloadable PDF and hot-iron embroidery transfer
- a needle - any embroidery needle will do, just make sure it's sharp
- a sheet of .005 mylar (or Dura-lar, basically the same thing
, it's what I happened to have on hand);
- a stencil brush
- children's gouache or tempera (I usually have big bottles of Utrecht tempera on hand)
- a thimble
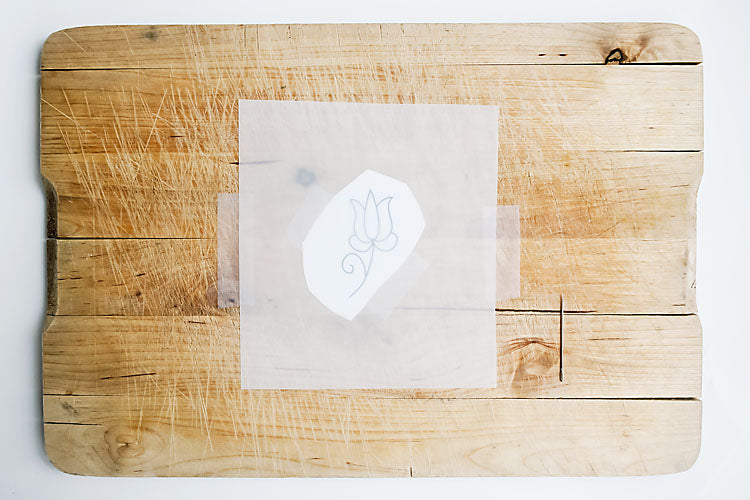
First, draw or print the design you want to transfer. I'll be using a motif from the Faraway Garden pattern set. Cut a piece of mylar big enough to cover it and overlap by a good amount, at least 2"/5 cm on all sides. Take a surface you don't mind poking holes in like a wood cutting board and tape the design to the board, then place the mylar piece on top and tape that to the board too, like this:
Now take your needle, and start poking holes in the mylar along your design lines. Try to keep the needle as perpendicular to the board as you can. The holes should be close enough together that you'll recognize your design on the fabric but not so close that they "run" into each other because the mylar sheet tears between two holes. Oh, and this is when you'll use the thimble!
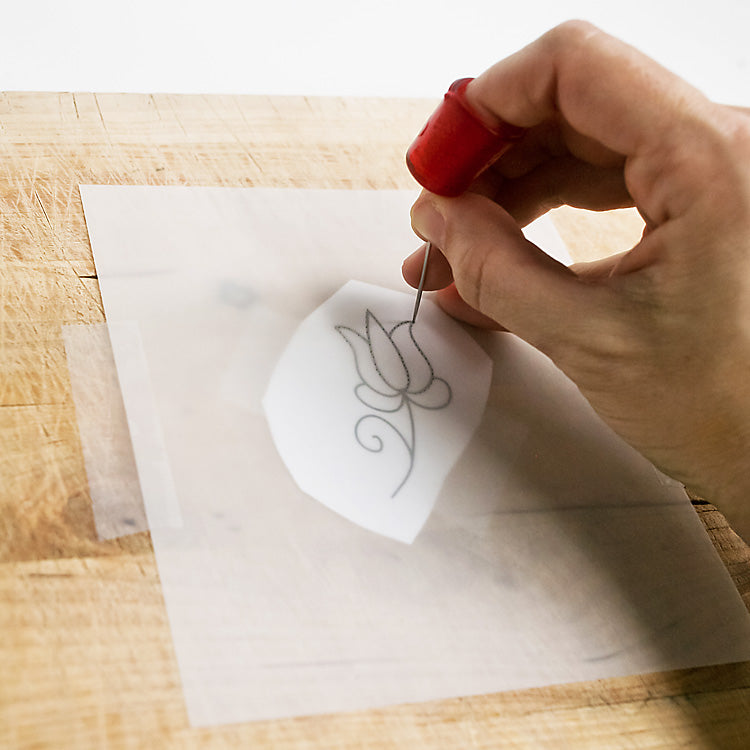
Experiment to see what works - I space my holes about 1mm (a bit less than 1/16") apart. The professional stitchers in Hungarian villages space them somewhat closer but they also have decades more practice, so... We won't set up that comparison. The point is, that you need to be able to recognize your design on the fabric when you stitch it. When you've poked holes over the entire design, hold the mylar sheet up to the light to check if the holes are all open:

Now comes the fun part! Place the mylar stencil you've just made onto your fabric and tape or pin it to the fabric around the edges.

Put some of the children's tempera in a small dish or pot. Then take your stencil brush, load it with tempera, and stencil in your design! Best thing to do is to use an up-and-down pounding motion with your brush for this particular combination of materials, but do whatever works - the main thing is to get the tempera through the holes of your stencil.

At this point, I'll take a detour to explain why I use children's tempera. Traditionally this method was done with wax paper and a mix of somewhat toxic ingredients that you can find in older embroidery books in Hungary. Here's a recipe:
- take one package of hardened paraffin wax (this was used to wax floors), melted on the stovetop over low heat;
- gradually mix in 150 g of wall paint (ultramarine for light fabrics and white for dark fabrics) while stirring continously;
- keep stirring until the mixture has the consistency of shortening;
- take pot off the flame and mix in 2-3 TBSP of paraffin oil and stir until smooth;
- pour into a small bowl while still warm and wait for mixture to harden.
- To use the paint mixture, take a stencil sponge and put paint thinner (see: gasoline!) on it, rub it over the paint mixture, then the stencil you've prepared and affixed over your fabric.
- The paint will come out of your fabric in the wash, and you can clean your stencils with a bit more paint thinner.
This recipe is from the book titled "Folk Art Fashion Album" from 1973:

I'm never giving up this book because I had a pretty hard time getting it. My mother used to have similar ones when I was growing up but, sadly (and as often happens with well-loved books), they've gone missing in the vortex of time. The beauty of the wall paint recipe is that it comes out of the fabric with a bit of vinegar once you're done stitching. The downside: it stinks. Literally. And it's kinda toxic. You probably shouldn't mix and use it indoors. So, although it's not quite the same thing, I replaced this stinky mix with children's tempera, which is non-toxic and (mostly) washes out of clothes. And instead of wax paper I use mylar because the tempera is more watery than the stinky mix and it soaks through the wax paper too quickly. Here's what your stenciled-on design will look like:

Let your design dry completely, and start stitching! Or - clean off your stencil with lots of water, dry it, flip it over, and transfer it again as the mirror image of the design on your fabric next to the one you've already stenciled on:

See how easy that was?

Let the transferred designs dry and then go, go get stitching!