SIM 2015: Vintage-Inspired Róza top tutorial by Rachael of Imagine Gnats
As part of Sewing Indie Month, participating designers create tutorials for each others' blogs. Today I have something really special for you: a tutorial by Rachael of Imagine Gnats! In this tutorial, Rachael shows you how to make a Róza blouse with a gorgeous cross-stitched center panel, using a cross-stitch pattern she created, inspired by vintage patterns in her collection. Not only that, her tutorial includes clever and easy alterations and alternate finishing ideas as well. The floor is yours, Rachael!

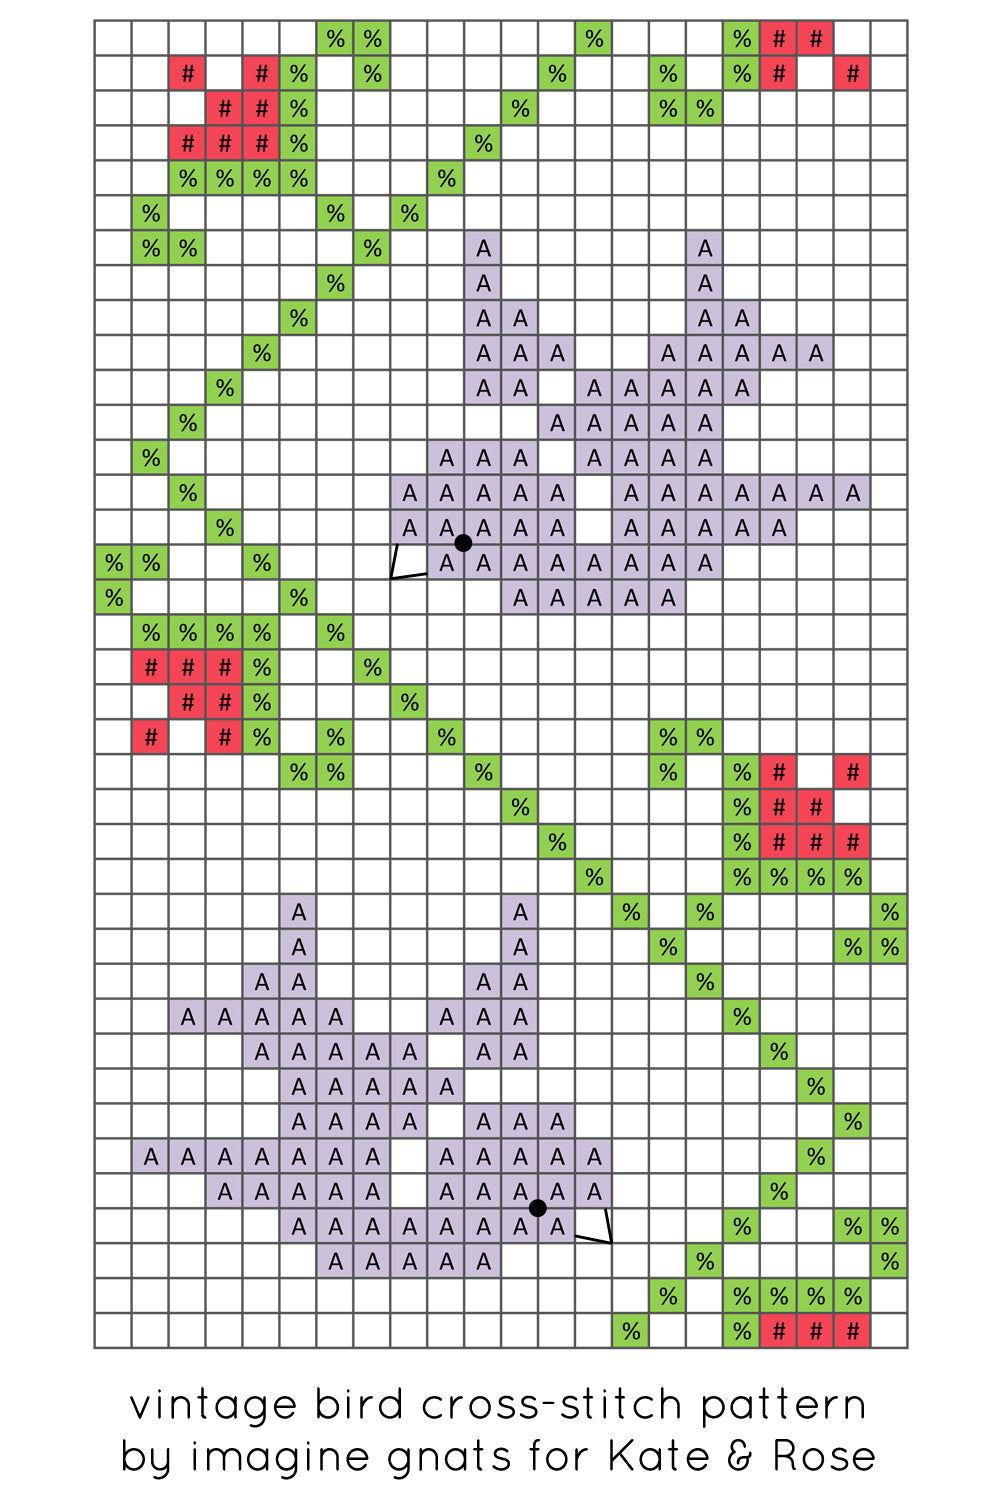
Hi, I'm Rachael from imagine gnats and I'm happy to be here for Sewing Indie Month 2015 with a free cross-stitch pattern and my take on the Kate & Rose Patterns Roza Top! I think that Kati's embroidery embellishments for her patterns are just so beautiful, and I wanted to share something in a similar vein but with my own twist. I started by studying some vintage cross-stitching that I am lucky enough to have around my house, done by my grandmother and my great-grandmother.

Click here to download the vintage birds cross stitch PDF pattern, and read about how I put together this lovely top below.
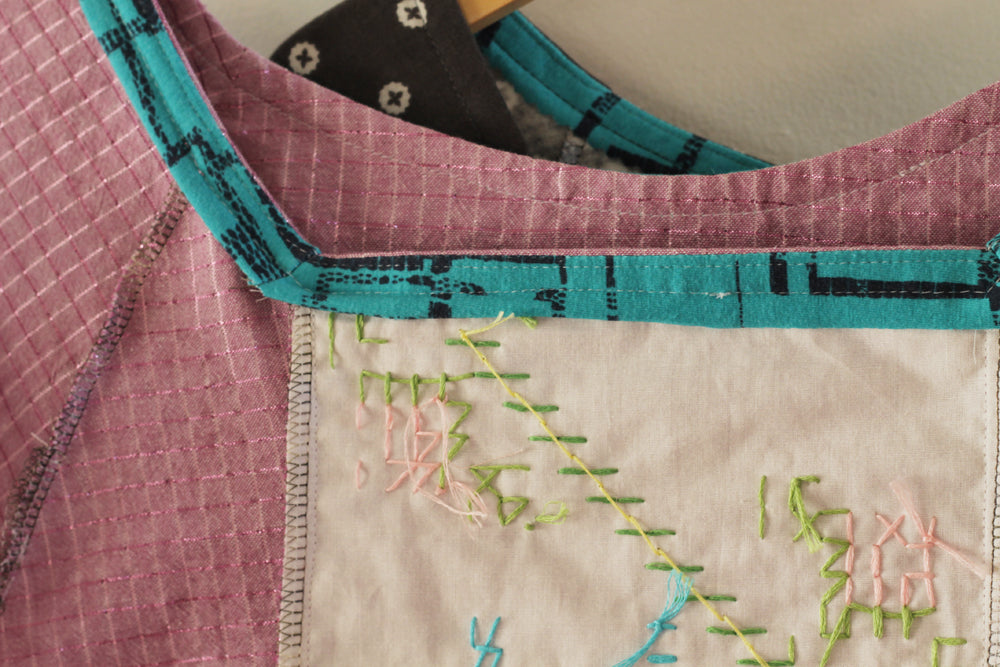
Construction Notes: Because I'm not a huge fan of over-sized tops on my frame, I sized down to start with my muslin. My measurements (bust 42", waist 35") landed me right in between L and XL, so I cut out a size L. The fabric is from Loominous by Anna Maria Horner (you can find the collection here in the imagine gnats shop), and its 1/4" grid was a perfect choice for a cross-stitched garment! I backed my center panel with a piece of sew-in Shape Flex from Pellon for extra strength, simply basting the two layers together before I began stitching. The original panel I cut out wasn't quite long enough, so when I put the shirt together I had to piece a little extra on the bottom, as you'll see in the photos. In order for my cross-stitch design to fit, I had to widen the front center panel. I divided in half the width that I added to the panel and then subtracted that amount from the inner edge of the side front pattern piece. Then I added additional height to the center panel piece to match the new height of the side panels. I made a muslin to check out all of these edits before cutting into my final fabrics.

I decided to make the neckline smaller, which I did by adding and additional 1/2" of fabric to the top edge of the front, back, and sleeves. I finished the neckline with knit fabric, following this tutorial with a slight change. I stitched the knit strips to the neckline and understitched before stitching in the center front panel. After the panel was sewn in, I pinned under the knit strip and topstitched around the full neckline.
To achieve a slimmer fit than in my muslin, I removed an additional section from the inner edge of the side front pattern pieces. I drew a line starting at the top center edge of the pattern piece and ending 2.5" in from the bottom, so it formed a triangle. Unfortunately, I over-estimated a bit on this one (probably should have made a second muslin!) and the shirt ended up too tight across the bust. I was able to fix this by adding 2" panels into both side seams, so for future versions I'll just split that difference and add the fabric to the outer edge of both the front and back pattern pieces. This also required a bit of adjustment in the sleeves and made me feel a bit like i was building a house of cards, but it all worked out in the end, phew!

I love how this shirt turned out, with the style and ease of a peasant shirt, but at the same time, also a slimmer fit that I am more comfortable with.


Those cross-stitched birds make me so happy. They feel very vintage-turned-modern and this shirt just has such a unique style that I love. I've also expanded this design into a full cross-stitch border pattern, which you can find here on the imagine gnats blog. I hope you enjoy putting a bird on your Róza Top too, and thank you Kati for having me! ---- Rachael, thank you for the tutorial! I love how this blouse turned out and I especially love the embroidery pattern you designed for the Róza. The top is so sleek and modern, yet with vintage details. And I adore the fabric you chose: it pairs so well with with cross-stitch, evoking chicken-scratch embroidery but much more. For more great ideas and tutorials, hop over to Rachael's blog at imagine gnats, and while you're there, take a look at her shop as well, Rachael has great patterns of her own (for embroidery too!) and lots and lots of yummy fabrics and notions!