Hungarian Embroidery Sampler Part 2: chain-stitched motif from Baranya county, Hungary
The first motif (at the bottom of the sampler pattern) is based on the designs used to embellish headscarves in the South-Western part of Hungary, in the regions called Baranya and Sarkoz, like in the image below:

(source)
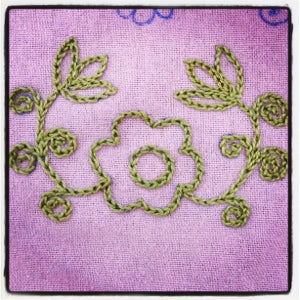
The embroidery from this region can also be wildly colorful and made up with lots of different types of stitches. But for the purposes of our sampler, which is meant to be easy even for someone who's never embroidered, we'll be stitching this motif all in one color (like the piece above), and using just a chain stitch to outline it, like this:
A couple things. As you might guess if you've read through the previous post, this sampler is meant for people who are new to embroidering. If you're an experienced stitcher, you likely already know what I'm about to write here. This post shows you how to start and finish your stitching so that you don't pull the fabric and the back of your embroidery looks almost as neat as the front. We won't worry about getting our stitches or motifs as perfect as a machine would - because we're not machines, of course! And, as I write on my About page, I'm relearning - and learning - a lot of this as I'm starting my business, and I want to share some of my journey with you. I hope you'll enjoy it as much as I have! Now, a note about supplies. I'm using a #8 thickness perle cotton thread made in Hungary (Puppets brand), and used by most embroiderers there.

Walk into any notions or craft store in Hungary and you will be greeted by a wall of this thread, in an explosion of gorgeous, deep color. You can of course use embroidery floss or any other brand of perle cotton thread. I don't like DMC perle cotton quite as much, I find it a bit stiff, which means it doesn't settle into the fabric as nicely (and also makes mistakes more apparent). But it will work just fine too. Other good-quality perle cotton threads are the Spanish-made Presencia Finca perle cotton in size 8 (order online here, for example), or the Romanian thread Valdani (which you can buy here). Pricy, I know, but one little roll lasts quite a while, and it is a truly gorgeous thread.

My favorite embroidery hoop is the snap-on plastic kind from Vervaco (sorry, I couldn't find a U.S. source), and I use size 24 sharp embroidery (or crewel) needles like these. I like the Vervaco hoops because it's easy to get the fabric into them and also, you can just unscrew the little hanger thingy and not get your thread tangled in it as you sew:

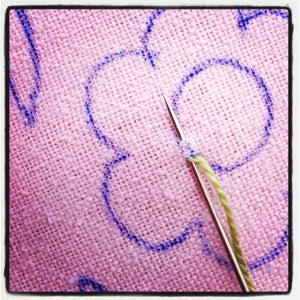
So, let's get started! Cut a piece of thread no longer than the length of your arm if you're using perle cotton (this is cheating - most people will tell you to use just half that length but in my experience perle cotton holds up better than most embroidery threads) as anything longer can get very tangled. If you're using floss or wool thread, cut a length of thread no more than 18", or about half the length of your arm. After you've placed your fabric in the hoop, starting at a point in the center circle of the flower, take your needle and bring it through from the wrong side of the fabric to the front, leaving a 1.5 to 2 inch (4-5 cm) tail dangling in the back, like this:

Leave this tail hanging loose for now, we'll work it into the stitching later. Now let's do our first chain stitch. Stick your needle back down to the wrong side right where it came up to the right side, then bring it back to the right side 1/8 of an inch (2 mm) further ahead, like this:
 Hook the resulting loop of thread with your needle:

And pull through! There's your first chain stitch:

Make sure you don't pull your stitch tight: the loop should really be a loop. Now repeat to make the next one:

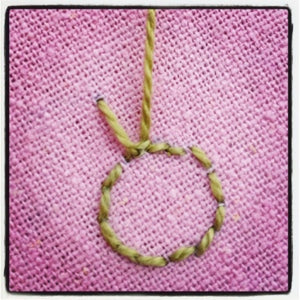
Keep going until you finish the entire circle. When you get to the last stitch (or... link in your chain), just make a quick anchoring stitch down into your first stitch, like this (I should warn you that some would consider this cheating - you could make a neat infinite loop but, well, I'm lazy):

Then, on the wrong side of your embroidery, lead your thread over to the next part of the flower motif (the petals) then stick your needle through to the other side:

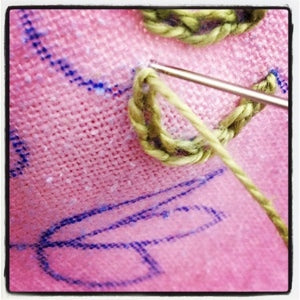
Then start stitching the petals of the flower. When you get to one of the sharp points at the edge of a petal, make an anchoring stitch before going on to the next chain stitch, like this:
When you get to the last couple inches (5 cm-ish) of your thread, on the wrong side loop it back through your stitches until it's secure:

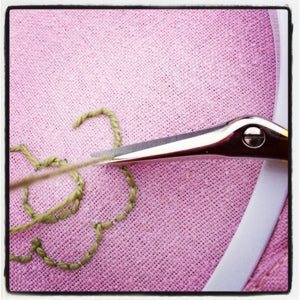
Then clip the remaining bit of thread very close to the embroidery:
At this point, do the same with the little tail left from when you began stitching. To anchor a new piece of thread, on the wrong side work it into youe existing stitches, leading to where you'll go on with your work:

When you're done with the flower, loop your thread over on the wrong side to the starting point of one of the vines:


Work your way through the motif, putting anchor stitches at all the points to keep them nice and pointy:

When you're done, the back of the embroidery will look something like this:

And the front, like this:

See you for the next installment of the Hungarian Sampler blouse!
Links to all tutorial pages in the series:
- Hungarian Embroidery Sampler part one: preparations - about threads, needles, hoops, and how to transfer embroidery patterns
- Hungarian Sampler part two: floral motif from Southwestern Hungary - chain stitch, starting and finishing your thread
- Hungarian Sampler part three: Transsylvanian tulips - buttonhole circles, stem stitch
- Hungarian Sampler: administrative update & some additional resources
- Hungarian Sampler part four: witchy stitching from Buzsák - open chain stitch
- Hungarian Sampler part five: filling in the witchy stitching from Buzsák - herringbone filling stitch
- Hungarian Sampler part six: stamina – completing our Buzsák witchy stitching - back stitch, straight satin stitch
- Hungarian Sampler part seven: variations
- Hungarian Sampler part eight: “woolly” stitching from Hungary’s central plains - 'fake' satin stitch
- Hungarian Sampler part nine (the last): Matyó rose from Northern Hungary - oblique or slanted satin stitch
- Blouses to embroider: any blouse with a flat front would work. The Róza top pattern would also work great for this project.
- Download the Hungarian Sampler PDF embroidery pattern (2 pages, formatted to print on either US Letter or A4 size paper).
- Share your work on Instagram and make sure you tag your pics with #kateandrosepatterns #hungariansampler!